Silver has an inherent beauty and value, making it the perfect luxury crafts material.
Owing to its malleable nature, silver can be easily hammered into shape. Its surface can also be punched, engraved or added to, to create a variety of decorative effects. It can be polished until it turns white and shines, or it can be coloured.
Once they’re created, silver objects are hallmarked to certify their quality and value. In this process, silver items are stamped with a series of marks which confirm the purity of the metal used and identify the maker, place and date of manufacture. In this way, consumers are able to distinguish between high-quality silverware and cheaper alternatives, such as metal objects which have been ‘silvered’.
This blog will explore how silver objects are made and the ways in which they are decorated. It will also attempt to identify and explain silver hallmarks.
How are silver items made?
For millennia, silver items have been hand-made by specially-trained craftsmen, known as silversmiths.
Traditionally, the silversmith will use a hammer to ‘raise’ sheets of silver into shape. As the silver is worked at room temperature, it hardens. To prevent the object from cracking, the silver is ‘annealed’ – that is, it is heated to soften it and make it more pliable. This metalworking technique can be used to craft a range of hollow- and flat-ware, such as bowls, jugs, plates, tea and coffee pots, and much more.
More tricky forms – such as stems, spouts, feet, and handles – are cast separately. This involves creating a mould shaped like the object, which molten silver is then poured into. The silver sets, and the item is extracted.
The separate parts of the silver object are then soldered or riveted together. In the former, two pieces are joined together by a melted metal filler, and in the latter they are fixed using rivets (metal pins or bolts).
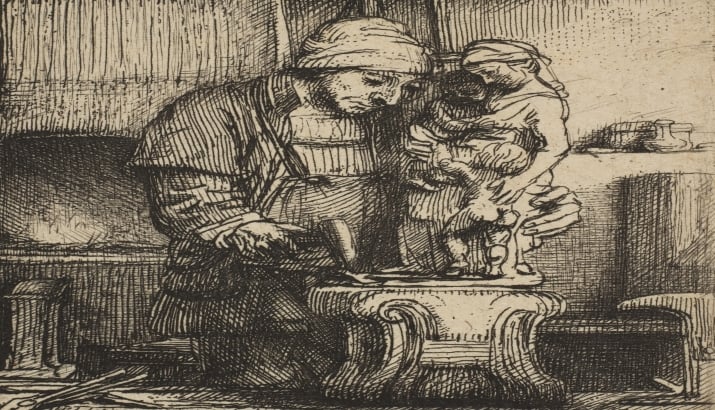
A print showing a goldsmith at work, employing similar techniques to a silversmith. The Goldsmith, 1655, by Rembrandt van Rijn, etching and drypoint. The Metropolitan Museum of Art. Accessed via Wikimedia Commons.
How is silver decorated?
Silver items are often decorated with raised, low-relief (repoussé) and/or with sunken (chased) forms and patterns. These two techniques are often used in conjunction with one another, to create a range of decorative effects. Additionally, designs might be incised (engraved) into the surface of the silver object, and left as they are or filled in to make them black (niello).
Silver items may also be coloured, by gilding them or applying enamels. Additionally, decoration—such as jewels, or silver beads—can be applied to the object, to further its beauty.
What follows is a list of the different ways that silver can be decorated.
Methods of silver decoration
Repoussé
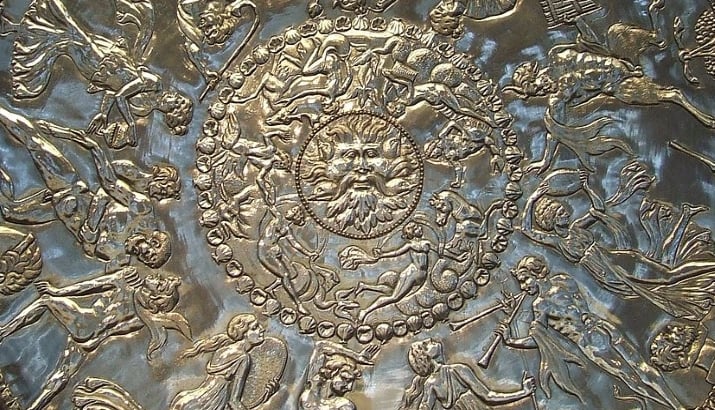
Repoussé is a French word, which translates as ‘pushed up’. In this method, the silver object is placed face-down in a bed of soft pitch (resin), there to take the blows from the hammer. The silversmith will then work, using a hammer and embossing tools, into the back of the silver object, thereby ‘pushing up’ the relief decoration on the front.
Repoussé is often used to create figures, animals, flowers, foliage, scrolls, and many other decorative forms.
This technique for creating relief ornament on metal objects has been practiced since antiquity, and examples survive from as early as the 3rd Century BC.
An example of repoussé work. The Great Dish, or Great Plate of Bacchus, from the Mildenhall Treasure: a hoard of 34 Roman silver pieces, dating from the 4th Century BC, found in Suffolk in the 1940s. The British Museum. Accessed via Wikimedia Commons.
Chasing
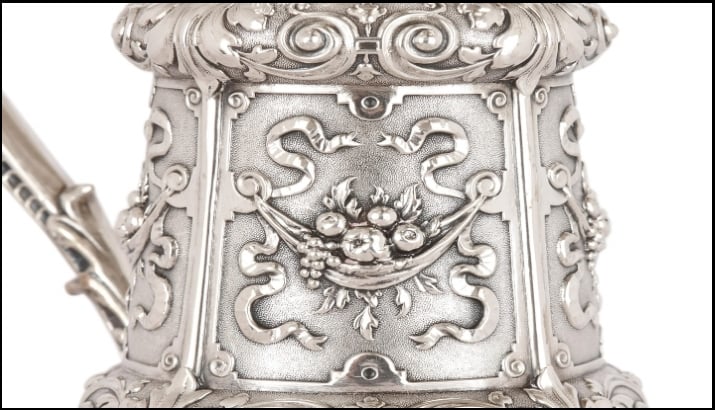
Chasing involves a similar method to repoussé, but the effect is different. In this technique, the back of the silver object is placed in the pitch, and its front facing upwards. Chasing involves ‘driving out’ (French: chasser) the design from the front of the silver sheet. It is sunk into the metal face, rather than raised out from it, as in repoussé.
Like repoussé, the chasing technique has been employed by metalworkers for many millennia. One form of it, called ‘flat chasing’, creates very shallow relief decoration, and was especially popular from the 18th Century onwards.
An example of chased work. Pair of German silver and glass claret jugs, c.1890. Mayfair Gallery.
Relief work tools
Silversmiths use a variety of hammers, punches and tools to achieve different types of relief ornament.
The main tools silversmiths use are as follows:
-
Liners, which have thin tips and are used for outlining and refining a design.
-
Planishers: hammers with smooth, flat tips which are used to raise large areas.
-
Doming tools, which are instruments with rounded tips, used for creating concave or convex designs.
-
Matting tools, which have rough patterns cut into their ends, intended to add texture to a design.
These are just some of many different types of tool that can be used to create relief work.
Engraving
In contrast to repoussé and chased work, where the silver is simply punched and none of it is removed in the process, engraving involves scraping away part of the surface. The craftsman uses a graver, or burin, with a sharp, V-shaped metal end that cuts into the metal sheet.
Although in use before this period, engraving was widely employed in Europe from the Middle Ages onwards. It was used to create armorials, crests, inscriptions and initials, which ornamented armour and weaponry, jewellery, religious icons, and more.
Engraving was (and still is) valued for its ability to achieve a high level of detail.
An example of engraved work. Tankard engraved with scenes depicting the Fire of London and the Great Plague. British, 1675/76. The Metropolitan Museum of Art. Accessed via Wikimedia Commons.
Niello
Niello describes the technique where engraved designs are filled with a black metallic compound. This liquid is poured into the engraved channels, the excess is scraped off, and the item polished. The process creates fine black lines which clearly stand out from the object’s silver surface.
In the past, niello was used to decorate jewellery, liturgical objects, and domestic items, including cutlery handles, cups, belt-buckles, and boxes.
Nielli (metal items decorated with niello) were produced by the ancient Romans, and some English examples from the 9th Century AD survive in the British Museum. The technique was revived during the Renaissance in Italy, most famously by the Florentine engravers, Maso Finiguerra (1426-1464) and Antonio del Pollaiuolo (1429/33-1498).
In Russia and in some Middle Eastern countries, the niello technique was employed from an early date. Russia is particularly well-known for its production of nielli, which began in the 10th-13th Centuries. The technique was revived in Russia in the late 18th Century, particularly in Tula. Indeed, niello became widely known as ‘Tula work’ in Russia, because of its popularity there.
An example of niello decoration. Russian silver, niello work box, c.1780. The Metropolitan Museum of Art. Accessed via Wikimedia Commons.
Bright-cut engraving
In the bright-cut engraving method, the engraving tool is polished before it is used to cut into the surface of the silver object. The design created by the polished tool will reflect light, giving the impression of brightness.
This technique was popular among silversmiths working in a Neoclassical style in the 18th and 19th Centuries. It is seen in the work of the Bateman family (English, founded c.1773), Paul Storr (English, 1771-1844) and Paul Revere (American, 1734-1818), for instance.
The American silversmith Paul Revere with a silver teapot and engraving tools. Portrait of Paul Revere, by John Singleton Copley, 1768, oil on canvas. Carolyn A. and Peter S. Lynch Gallery. Accessed via Wikimedia Commons.
Colouring
Another way that silversmiths decorate silver objects is by colouring them, either partially or entirely. This is often done by way of gilding, or enamelling.
Silver-gilt
Silver-gilt, also known as ‘vermeil’, is when gold leaf is applied to a silver object. Once gilded, the object has the appearance of being crafted from solid gold.
Silver-gilt is valued for the fact that it is much cheaper, and it weighs a lot less, than gold. For this reason, many important wearable items—such as crown jewels and medals—are crafted from silver-gilt. By gilding silver, the need for cleaning and polishing is also reduced because the gold layer (which is less reactive as silver) acts as a defensive barrier to the silver underneath.
The crown used for the coronation of Napoleon I in 1804, as Emperor of France was crafted from precious silver-gilt. It is decorated with cameos, intaglios, velvet, and embroidery. Louvre Museum, Paris. Accessed via Wikimedia Commons.
Metalworkers have gilded silver objects in Europe and Asia since ancient times. The most common techniques are fire-gilding with mercury and electrolysis. For more information on gilding, see our blog on ormolu (gilt bronze).
Enamel
An example of enamelled silver. The Fieschi Morgan Staurotheke reliquary, early 9th Century. Gilded silver, gold, cloisonné enamel, and niello. The Metropolitan Museum of Art. Accessed via Wikimedia Commons.
Enamel is a coloured substance, which is made from glass. It can be applied to silver objects to give them colour and textual variety.
In the enameling process, enamel is applied as a vitrous glaze onto the surface of the silver object, and fused by intense heat.
The main types of enamelwork are ‘champlevé’, ‘cloisonné’, ‘guilloché’ (also called ‘engine turned’), ‘plique-à-jour’ and ‘basse-taille’. Our blog on enamel explores these techniques in greater detail.
Enamelwork has been created across the globe since antiquity, with jewellery and other examples surviving from the 13th-11th Century BC.
Stone-setting
This parcel gilt silver and glass chalice is finely decorated with enamel and semi-precious stones. Chalice, mid-15th Century, possibly Hungarian. Metropolitan Museum of Art. Accessed via Wikimedia Commons.
Colour can also be given to silver by applying precious or semi-precious stones, either as cabochons (that is, as domed shapes) or in faceted forms.
The stones that have historically been used to decorate silver include diamonds, rubies, emeralds, sapphires, and agates. These stones may be fixed by metal wires soldered to the object, held between metal strips, or inserted into holes made in the surface of the metal.
Silver jewellery is often bejewelled with precious stones, but silver decorative arts may also be decorated in this way. These techniques have been practiced for thousands of years, in all parts of the world.
Filigree
Silver jewellery and small-scale objects are often decorated with lacelike openwork designs, which are formed by twisting and weaving together fine silver wires. Known as filigree, this decorative technique has been employed since antiquity.
Beading
Threads of silver beads (‘beading’) can also be soldered on to silver items for decoration. Beading is often used to articulate the edges of objects, such as the outline of handles, or rims of dishes, covers or feet. It is commonly seen on 18th-Century Neoclassical silverware.
Note how the foot, neck of the cup and the rim of the lid are beaded. Cup and cover, 1771-1772, by Louisa Courtauld and George Cowles. Silver with Neoclassical style chased and applied decoration. The Victoria and Albert Museum. Accessed via Wikimedia Commons.
What are the stamped marks you find on silver?
Silver hallmarking
In the medieval period, craftsman began to combine (‘alloy’) silver with other metals to make it harder and more durable. In response to this, a system of ‘hallmarking’ emerged to distinguish between good and poor quality silverware. Hallmarking was invented in the 13th Century in France and was soon picked up by other countries.
According to this system, silver is marked with a variety of symbols which tell the consumer several things about the object. These marks are used to confirm that the object contains a high percentage of silver (in relation to other metals), identify the silversmith or company who made it, record the location and date of its production.
"'Silver, Certain, Sir!'", illustration of "A Peep at Washoe" by J. Ross Browne, in Harper's Monthly Magazine, January 1861. Accessed via Wikimedia Commons.
Assayer’s mark
The ‘assayer’s mark’ is the stamp that verifies the quality of the silver used to craft the object. If an item is crafted from sterling silver, for instance, it will be officially marked to guarantee that it is made from 92.5% silver and 7.5% of some other metal, usually copper.
These marks are provided by Assay Offices, which were set-up in the medieval period to assay (‘assess’) the purity of precious metals. The assayer’s mark assures the consumer of the value of the item.
Mark of origin
The ‘mark of origin’ stamp identifies the location of the Assay Office where the silver piece was validated.
Date letter
A single letter is often punched onto the surface of the silver item to record the year it was assayed. While the same letters are used in cycles, they are distinguished from one another by their font, size, and by the shape of the profile they are placed within.
Maker’s mark
The marker’s mark was originally a symbol but from the 15th-Century onwards it took the form of the silversmith’s initials. The initials are often enclosed in an escutcheon. To differentiate between makers with the same initials, different fonts and profile shapes are employed.
Other marks found on British silverware
Silver is sometimes marked with a sovereign’s head. This was introduced in the late 18th Century to indicate that the duty (tax payment) on the piece had been paid.
Commemorative marks recording special dates are sometimes also found on silver items. For instance, a stamp was created for the 1953 Coronation of Queen Elizabeth II.
Silver items can also be stamped with import marks. These were introduced in the 19th Century to show that a piece was of foreign manufacture.
The stamp of a particular journeyman (a trained freelance silversmith) can sometimes be found on a silver item. Journeymen often worked alongside masters or within large workshops, and they were paid on a day-to-day basis for the work they produced. It was therefore important to be able to identify the items they had crafted from the large amount of work produced. The journeyman mark is often a small symbol next to the maker’s mark.
Hallmarks on a silver salver. Mayfair Gallery.
This photograph of a silver salver presents us with a full set of hallmarks. They can be read as follows from left to right:
-
The ‘TWD’ in the hexagon is the maker’s mark for the silversmith, Dobson & Sons (English, founded 1877).
-
The symbol of the lion passant (walking) is the British assayer’s mark, indicating that the piece is crafted from sterling silver.
-
The leopard’s head is the mark of origin for London, where the piece was assayed.
-
The capital ‘S’ in the shield escutcheon is the date-letter for 1893, when the salver was competed.
Contemporary hallmarking
Today, silver pieces are stamped with some, but not all, of the traditional marks. They tend to bear an assay office mark, a patron’s or maker’s mark, and a millesimal fineness mark (for instance, the number 925 if the piece is sterling silver).
Hallmarks help us to understand and appreciate how much work goes into ensuring the circulation, and continued production, of high-quality silverware. Equally, by learning about the traditional techniques employed by silversmiths to hand-craft and decorate objects—all of which require time, effort and skill—one can understand why silver antiques are considered so precious.


